Unleashing the Power of Android on Windows: Your Guide to Installing Windows Subsystem for Android (WSA) on Windows 10
A Guide to Installing Windows Subsystem for Android on Windows 10

Introduction:
The Windows Subsystem for Android (WSA) is an exciting development that allows users to run Android applications directly on Windows 10. This feature brings the best of both worlds together, enabling you to enjoy your favorite Android apps seamlessly on your Windows PC. In this blog post, we'll walk you through the step-by-step process of installing WSA on Windows 10 and provide you with the necessary resources to get started.
Step 1: Check System Requirements:
Before installing WSA, make sure your system meets the following requirements:
- Your device must be running Windows 10 (version 22000 or later) with the latest updates installed.
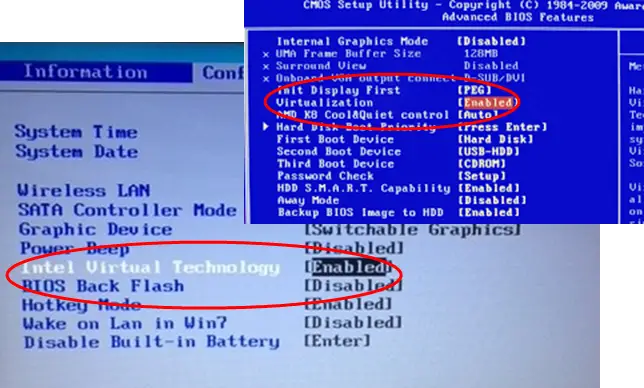
- Your device must support Virtualization Technology (VT-x/AMD-V) and have it enabled in BIOS settings.
- You need a 64-bit version of Windows 10.
Step 2: Enable Windows Subsystem for Android Feature:
To install WSA, you'll need to enable the Windows Subsystem for Linux feature. Follow these steps:
1. Press the Windows key and search for "Turn Windows features on or off."
2. Open the "Turn Windows features on or off" settings.
3. Scroll down and locate "Windows Subsystem for Linux" from the list.
4. Check the box next to it and click "OK" to enable the feature.
5. Restart your computer when prompted.
Step 3: Download and Install WSA:
To download the WSA package, you can visit the official GitHub repository. Here's how you can get it:
1. Open your web browser and go to the WSA GitHub repository: WSA GitHub Repository.
2. Scroll down to the "Assets" section and find the latest available release.
3. Download the WSA AppxBundle file by clicking on it.
4. Once the download is complete, navigate to the download location on your computer.
Step 4: Install the WSA Package:
Now that you have the WSA package downloaded, it's time to install it. Follow these steps:
1. Double-click the downloaded WSA AppxBundle file.
2. The Microsoft Store app will open, and you'll see a confirmation message for the installation.
3. Click the "Install" button to start the installation process.
4. Wait for the installation to complete. This may take a few minutes.
5. Once installed, you'll find the WSA app in your Start menu.
Step 5: Set Up Windows Subsystem for Android:
After the installation, you need to set up WSA to start using Android apps on your Windows 10 device:
1. Launch the WSA app from the Start menu.
2. Follow the on-screen instructions to configure your Android environment.
3. You'll be prompted to sign in with your Microsoft account, grant permissions, and set up the Google Play Store (if available).
4. Once the setup is complete, you'll have access to Android apps through the WSA interface.

Conclusion:
Windows Subsystem for Android opens up a world of possibilities by bringing Android apps to your Windows 10 PC. With this guide, you can now install and set up WSA on your device, seamlessly merging the Android and Windows experiences. Remember, WSA is currently in preview, so you may encounter some bugs or limitations along the way. However, it's an exciting glimpse into the future of app compatibility and cross-platform functionality.
Explore the vast collection of Android apps and enjoy the convenience of accessing them directly on your Windows 10 and Windows 11 PC with Windows Subsystem for Android!

Working
ReplyDelete